Showing posts with label garden. Show all posts

Monday, October 4, 2010

Chopped Eggplant

There isn't a day that goes by that I don't run across something that makes me think about my Grams.  A dirty joke (she could have a pretty raunchy sense of humor).  Calla Lilies at Trader Joe's (we would "paint" them with powdered chalk at Easter time). Sweet 'n Low packets at a restaurant (she helped herself to them - for her morning coffee at home). All kinds of random things.  Like our vegetable garden - I think often about how much she would have liked it.  She would have liked making her chunky mash of our carrots and turnips. Or maybe some sour-creamy borscht from the beets.  And then there are the eggplants.  No matter what the occasion, my grandma brought two dishes to all of our family gatherings - chopped liver and chopped eggplant.  Now, for me, the chopped liver was a no go.  But the eggplant? - that was another story. 


Gram's Chopped Eggplant (or as close as I can get it)


ingredients
  • 1 large eggplant (she always used the common Black Beauty) or about 1 1/2 -2 lbs. other variety
  • 1 medium red pepper
  • 1 medium tomato
  • 1/2 medium white onion
  • olive oil
  • vinegar
  • sugar
  • salt and pepper
post roast
method
  1. Pierce each eggplant a couple of times with a fork (they can explode in the oven if you don't!), place them and the pepper on a lined baking sheet.  Roast them at 400° until the eggplant begins to collapse and is easily pierced with a fork, 20-40  minutes depending on  the size.
  2. After roasting, place the pepper in a paper bag or tightly covered bowl till cool, 10-15 minutes. Set the eggplant aside until cool enough to handle easily.
  3. While you wait, dice the onion and tomato.  You want the pieces small, but not overly fine.  Think salsa. Add to a medium bowl.
  4. Scoop softened eggplant out of the papery skin into the bowl with the diced veg.  Discard skins.
  5. Peel and seed the pepper.  Give the pepper a rough chop and add to the bowl.
  6. Drizzle in olive oil - start with a good tablespoon.  Add a couple teaspoons vinegar - cider, white wine, plain white, whatever you like best.  Sprinkle with sugar - start with 1/2 a teaspoon.  Add a couple hearty pinches of salt and black pepper.
  7. Chop the whole mess up. My grandma always used a mezzaluna to chop her eggplant, but use what you have.  Two butter knives will do the trick.  Stop when you like the consistency. I've seen versions where it is blended. My grandma's was chopped by hand and still chunky.
  8. Taste and add additional seasonings as you like.  Put in an airtight container and let it sit in the fridge for a day or two for the flavors to meld.  You might adjust the seasoning again at that point.  Serve it cold or at room temperature.  Grams always served it with fresh rye and egg breads.  It's good on crackers, too.

Wednesday, September 29, 2010

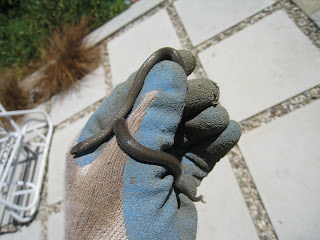
Garden Snake

Found this cool snake in the yard the other day.


Monday, September 27, 2010

Saucey!


Since the tomatoes started going off a few weeks ago, I have had two big saucing sessions.  I did two separate batches each time - one with all Amish Paste tomatoes, and one with a mixture of different varieties.  

For both batches, the first part was the same.  After blanching them for 60-90 seconds (depending on the size), the tomatoes went into an ice bath and then were peeled, sliced and seeded.  It is messy, but very easy to do.


With the mixed varieties, I spooned them into the blender and whizzed them up into a slurry.  I poured the puree into clean quart-sized jars, lidded and labeled them, and sent them off to live in the freezer until needed.
With the Amish Pastes, I set about making an actual simple tomato sauce.  I used Alice Waters' recipe from The Art of Simple Food - there's not much to it, but with tasty tomatoes it really makes a delicious basic sauce that you can use on its own or easily dress up in dozens of different ways.  To store, I did the same as above - into clean mason jars and into the freezer.

So this winter when we are looking for some bright summer flavor, I will most likely use the mixed tomato puree to make tomato soup - with croque monsieurs or other grilled cheese sandwiches, of course.  The simple sauce will eventually partner up with some meatballs as it is, or maybe be cooked down into a heartier bolognese, or possibly make it into a casserole dish as lasagna or eggplant parmesan or....

Thursday, September 23, 2010

Meet the Tomatoes!


With such funny, mild weather this summer, it has taken until just the past few weeks for us to finally meet this season's tomatoes. 

the extended family


Back in April, when I planted the majority of the summer garden, I sowed seeds for nine tomato varieties directly into the upper bed.  Though I had planned to start seedlings and transplant, time lapsed (as it tends to do) and I skipped some steps and put the seeds straight into the ground.  The cotyledons sprouted quickly, and lovely strong plants followed.  We had huge, bushy plants for months with no fruit to speak of.  Slowly, at the end of August, the tomatoes finally started appearing.

  
Ox Hearts

Our only crop to get bloom end rot - not on all of them, but on enough.  I'd say good for saucing, but not the best eating tomato.  A little mealy.

 
Orange Fleshed Purple Smudge

The catalog described these as more beautiful than tasty.  Ours taste pretty good, but the beautiful swipe of  purple that's supposed to grace the top of the fruit has yet to show itself.
 
White Queen 

So delicious!  Firm, but fairly seedy.  Fruity, a nice touch of citrus, and really tasty.
 
Galo de Table

Yummy cherry.  A multi-colored variety.  They are ready to eat when they are yellow (firm and tangy), great at orange (sweet with good bite), and at orangey-red (very sweet and very juicy).
 
Emerald Green

This has been our most prolific thus far.  Really tasty and really large.  Sweet, but still nice and tangy.  The catalog mentions that they grow with ease and with relatively little heat - which has been true for us.
 
Black Cherries

So pretty and dusky colored.  Big producer with firm, rich-flavored fruit.  And delicious oven-dried.  (Thanks for the inspiration Livi and Steve!)
 
Amish Paste

I waited several years to finally get this variety.  I'd looked for seedlings at local nurseries and online, but they were always unavailable - at least when I was looking.  Part of settling on seed this year  was the impetus to finally have some Amish pastes. Totally worth it!  Not a great looking specimen, and not a great eating variety, but when it comes to making sauce this is holding up to the hype.  Big tomatoes, almost no seeds, great consistency and amazing, zingy flavor.

Of the nine different tomatoes that I planted, we are still waiting on two of them - they have plenty of fruit, but it's all still green.  Our giant German Red Strawberry was the first to ripen, but after that one ready fruit, the rest have stayed green.  Pink Ponderosa is also slow going. All of the seeds came from Baker Creek Heirloom Seeds - which is one of the most fun, inviting, inspiring seed catalogs to peruse.  I definitely recommend indulging in a paper copy.

Wednesday, September 22, 2010

Lawn Part 1

I have been making steady progress over the last few weeks on getting our lawn in.  This marks one of the last remaining big projects for the back yard.  We had planned for a lawn area when we first started laying out our backyard a number of years ago.  Over the last few years, I have researched different grass varieties and began to think that it wasn't such a good idea given our water shortages in Los Angeles.  Yet, at the same time, we both love a good lawn game with friends and we love entertaining.  About 6 months ago, I found a grass that had a lot of promise.  Called UC Verde, it is a buffalo grass developed by UC Davis specifically for Southern California and arid regions.  It requires a quarter of the water that typical grasses require, and it needs little or no mowing.  Some people have not mowed their lawn in 2 years.

After reading a few blogs about people's experiences installing this grass variety, we decided to go ahead.  One thing though, the grass is only available in plugs.  When I first researched pricing in the Spring, there were only a couple of sources to purchase through, now the sources have multiplied and it appears you can even order it through Armstrong.  I ordered mine through Florasource.  Using their recommendations, I determined that about 800 sf of lawn and plugs spaced at 15" intervals would yield roughly 500 plugs.  Four 128 plug trays are arriving tomorrow.


For the installation, I first laid out the sprinkler system: 3/4" sprinkler valve, 3/4" lines, and 6 pop-ups. For the nozzles, I am using these Rainbird brand high efficiency rotary nozzles.  They put out less water per hour, this reduces runoff, allowing the water to soak in properly.  They are also elgible for rebates from the state (25 head min.) and are readily available from Home Depot or your local sprinkler supply house.  I use J. Harold Mitchell in Pasadena.  They are not the cheapest, but they will answer all your sprinkler related questions as well as having lots of hard to find parts.  I have used them extensively for our drip system in our vegetable garden.

 
Valves for the lower half of our yard.  The lawn sprinkler valve has the
3/4" pvc running down.

Trenching was the hardest part but a pick axe, trench shovel and full day's work will do.  Next, I layed  the pipe in the trenches and glued it up.  This is a pretty easy process.  Cut with the PVC cutter, coat the pipe and fitting with glue, hold together until set.

For the pop-up bodies, I am using a 12" Rainbird 1800 series pop-up.  I decided not to use the cheaper 6" since I thought if I allowed the grass to grow out I may have problems with it the heads adequately clearing the grass.  The pop-up and nozzle assembly is connected to the water line with a swing joint giving lots of flexibilty in adjusting the head as well as raising or lowering the height if need be.

Spinkler assembly: the 12" pop-up body is attach to 2 swing joints, then a
1/2' by 12" pipe, then 1 additional swing joint that is attatched to a threaded
3/4" 'T'.

After all piping and sprinklers are glued up, I removed the sprinkler heads and turned on the valve to flush the line of any dirt or debris.  I let this run for a few minutes before I turned it back off.  I screwed the heads on and turned the valve on again to check for orientation and spray radius.  At this point I just needed to make my final adjustments and fine tune the spray distance with the adjustable screw on top of the nozzle.

The sprinklers installation is complete.  Next up, Part Two: tilling, leveling, and planting.

Tuesday, August 10, 2010

Tomato!

 
German Red Strawberry. Seeds from Baker Creek.

First one!  WOW.

Tuesday, April 20, 2010

Mulch!!

Last Friday morning (while I was laying poolside in Hawaii) Jeremy accepted an enormous delivery of mulch back at the Rancho.  Instead of taking it to the dump, Finch's Tree Service brought a dump truck full of chipped branches and leaves and unloaded it right in front of the house.


As you can see in the picture, my car is parked just feet behind the huge mound and is about half the size of it.  Our plan is to lay a thick layer of mulch over as much of the unplanted areas of the backyard as possible - both to (fingers crossed) keep the weeds at bay and add organic material to the dusty, clay soil.
 

Jeremy made amazing progress on the pile over the weekend.  And, with a few loads between the two of us after work last night, the monster in the driveway is now about 1/3 of its original size.  After we finish getting it moved entirely we'll post pics of how it's really helped transform the weedy spring yard!

Monday, March 22, 2010

Garden Salad

The first of the fennel came ready this week.  The bulbs are still really small, but the color and the soft, wispy greens are truly beautiful.  I went out into the garden to harvest cauliflower for my Auntie Hannah's pasta, and was inspired to make a small salad to go with the meal.  I plucked up one of the larger fennel bulbs, snipped a bunch of new growth from one of the parsley plants, and picked a few bright nasturtium flowers.  Just a few things I passed in the patch that jumped out at me in the moment. 


Onto a dinner plate, I used my japanese ceramic slicer to thinly shave the fennel.  On top of the fennel, I layered the roughly chopped parsley and torn flower petals.  I sprinkled it with sea salt and fresh pepper, our "good" olive oil, and a healthy squeeze of lemon. Done.


The quick bit of inspiration from the garden was fresh, crispy, cool, and a fun combo of flavors.  It went well with the savory pasta and, as Jeremy was quick to comment, was super pretty! 

 
So definitely not so much a "garden salad" garden salad.  More just a salad from our garden.

Friday, March 19, 2010

Cauliflower Pasta from the Rancho


Several years ago my mom described to me, in great detail, a meal that she had eaten at my aunt and uncle's house.  A simple pasta dish, but one that she had found so surprising and delicious that she couldn't stop talking about it.  My Aunt Hannah had cooked down loads of onions on the stove top until they were soft and sweet, and then added very roughly chopped cauliflower.  After the the veg had cooked awhile, she seasoned it with salt and crushed red pepper, mixed it with penne pasta, and topped it with grated pecorino romano cheese.  It sounded fine, I thought, but not necessarily warranting this extent of my mom's praise.  I decided I would have to make it myself to see what the fuss was all about.  My mom couldn't have been more right.  The dish was simple, with few ingredients, but highly delicious.  Not overly rich like macaroni and cheese or alfredo sauce, but creamy and flavorful, and really satisfying.  It quickly became a favorite.  It also set cauliflower as an absolute given in our garden.  Despite attracting colonies of dusky, gray aphids to our vegetable beds, I have increased the number of seeds sown each year.  Last night, in celebration of getting to spend more time in the garden after work now with day light savings, I harvested our first two heads of the season and made my aunt's delicious dish.

Ultimately, I found out that my aunt had adapted it after seeing Mario Batali prepare it - on television I think.  Following is my interpretation of hers.

Auntie Hannah's Cauliflower Pasta

ingredients 
  • red onions, 4 large - cut into 1/8 inch half moons
  • cauliflower, 2 large head - cut roughly into large chunks
  • flat leaf parsley, 1/2 cup or more - chopped
  • zest of 1 lemon - I like long strips, but grated could work, too
  • crushed red pepper flakes - I like quite a lot, but to your own taste
  • salt
  • good olive oil
  • Pecorino Romano, or other salty, hard cheese -1 cup grated
  • Penne or fusilli, 1 bag
method

1.  Heat a tablespoon or so of oil in a large pot or dutch oven over medium heat.
2.  Add onions.  Sprinkle on a couple hearty pinches of salt to get them going.  
     (It seems like way too much, but they will cook down significantly.)
3.  Cook 20-25 minutes, stirring occasionally, until the onions are soft and beginning to color.
4.  Add cauliflower. Stir to combine. Continue cooking until cauliflower softens to desired bite.  


note:  The softer it is, the creamier/saucier the dish turns out.  We like some whole pieces of cauliflower left.  I usually cook it at this phase for 20-25 minutes.  The smaller pieces break down, with the larger pieces staying whole and more firm.

5.  While cauliflower is cooking, heat salted water and cook pasta until al dente. Drain, reserving some pasta water.


6.  When cauliflower is softened, add pepper flakes, zest, and parsley.  Stirring gently to combine.  Taste for seasoning, adding salt if needed.
7.  Add pasta. Add in stages, until you have the ratio of veg to pasta that you prefer. (I don't usually use quite all of the pasta.)  Gently combine.
8.  Add cheese.  Combine.  Use reserved pasta water if you need to loosen the dish to desired consistency.
9.  Serve.

Sunday, February 28, 2010

Bulbs: Part 1 3/4

 
First sweet, yellow bloom. 

Friday, February 19, 2010

Winter Garden Update

It has been three months since we got the seeds in the ground for our winter garden.  Things have come along nicely and with fairly minimal input. (Except for a couple minor mishaps involving a certain dog and some of his friends.  Sorry peas!)


It always feels like a slow start when you're waiting to eat from the garden, but so far we've been able to sample  some beautiful beets and beet greens, some carrots, turnips, arugula, a bit of chard, and some radishes on hot buttered toast.  But the real bounty is just starting to be unleashed.


I am personally setting my sites on the cauliflower.


Still attempting to get into the habit of having a perpetual garden that is edited and re-seeded on the regular (as opposed to once a season), I spent some time last weekend tidying the vegetable beds.  Among other things, I harvested all of the turnips to make turnip pickles and got a good bit of new seed in the ground.
  • In the lower bed
    • 1 row heirloom shelling peas  (Renee's Garden)
    • 1 row Tonda di Parigi carrots  (Renee's Garden)
    • 1 row French Breakfast radishes  (Seed Savers)
    • Filled in 1 row of Cosmic Purple carrots  (Renee's Garden)
    • 1 row purple top white globe turnips (Seed Savers)
    • 1 row Chef's Choice cauliflower  (Renee's Garden)
    • 3 Mammoth Red Rock cabbages  (Seed Savers)
    • 2 Copenhagen Market cabbages  (Seed Savers)
    • 1 row 1/2 Chioggia & 1/2 Burpee's Golden beets (Seed Savers)
  • In the upper bed
    • 1 row Rouge d'hiver Romaine lettuce  (Renee's Garden)
  • Herb Garden
    • Dill  (Ferry Morse)
 

Wednesday, February 17, 2010

Bulbs: Part 1 1/2

The daffodils are beginning to peek through the mulch under the pepper tree.


A small thing, but very exciting.

Tuesday, November 17, 2009

Rancho Rewind: Beet Pizza

One of the things that I'm most looking forward to in the winter garden are all of the beets.  Last year Jeremy and I made beet pizza a couple of times, and flipping through photos, I came across one of our creations that got me excited for this years crop.


We used the regular pizza dough from Trader Joe's for this one.  (We need to start making our own, I know it's easy, but not as easy as buying it from TJs!)  We usually brush a little olive oil onto the sheet pan and then sprinkle that with some yellow corn meal. (Nope, we don't gots a pizza stone.)  After a couple of initial versions, we decided that with a beet pizza we need to pre-bake the crust before adding the toppings (the beets and beet greens have so much moisture that it makes it hard for the crust to crisp up if you don't). So we bake the plain crust for 8 minutes or so, pull it out and dress it up.

Dressing it up:
  • sauteed beet greens
    • I just chop them up and through them into a hot cast iron pan with a little olive oil, salt and crushed red pepper.  Cook until wilted and just tender.
  • roasted beets
    • I scrub them, cut the tops off, and put them into a roasting pan or pyrex.
    • larger beets I might cut in half, but otherwise I leave them whole.
    • sprinkle a couple of teaspoons of water into the pan, cover tight with aluminum foil, and roast at 400 degrees for about 30 minutes, until fork tender.
    • let the beets cool, then peel the skins off with your fingers.  (it's a little messy, but the skins come off really easily.)
    • cut the cooled beets into thick slices.
  • walnuts , rough chopped
  • goat cheese
  • parmesean cheese
  • fresh parsley, chopped
Spread the goat cheese on the pre-baked crust.  Distribute the greens and the sliced beets over the cheese.  Sprinkle walnuts and parmesean over the top.  Bake for another 8-10 minutes. Sprinkle parsley on the finished pie.


We kept it pretty basic, but you could easily add other flavors that would be great.  Maybe some balsamic vinegar or flavored olive oil or walnut oil drizzled over the top when it comes out of the oven?  Chives, onions or shallots?  Pickled onions or shallots?  Pine nuts?  Blue cheese?  No cheese?  However it is modified, I am looking forward to recreating it with at least a part of the new season's crop.  Hurry up beets!

Tuesday, November 3, 2009

Bulbs: Part One

Along with the edibles, it has always been a part of the plan to have a cutting garden at Rancho Garbonzo as well.  Natives they are not, but a vase of dahlias or tulips or peonies on the mantle is hard to beat.  So, last weekend I got started by planting 100 daffodil bulbs on the slope under our pepper tree.  (Daffodils remind me of my Grams.)


The area is really shady, with only a little dappled light here and there throughout the day.  Unlike the rest of our yard, this slope has been covered with a thick layer of mulch for the last few years - partly just leaves and twigs that have fallen from the huge tree above, and partly a deliberately placed load of chipped yard waste that the tree trimmer dropped off a couple of years back. Also unlike the rest of the yard, the soil that I uncovered beneath the mulchy top layer was lovely! Not a clumpy ball of reddish clay in sight! Now is that just the mulch working its magic over time on our crummy soil or was there completely different soil in this section of our yard to begin with?  I think the former makes the most sense.  Three cheers for the mulch!  So, bone meal and bulbs into the ground and fingers crossed; I'm hoping that we'll see some of these babies popping up by the start of Spring.


(Unfortunately not my yard, the pics are scanned from the bulb bags.  I bought them at Costco.)

Friday, October 23, 2009

Berry Patch


Last weekend we planted our berry patch.  We dug out the crusty lump of earth, just below the herb garden, removing the fine clay soil about a foot deep.


 Into the hole went a mass of alfalfa that will eventually rot and give the spot a boost of organic matter (we hope).


The alfalfa was topped with many bags of new, loamy, composty garden soil.  And nine new strawberry plants were planted.  Woot woot!  We planted Alpine Strawberries or Fragaria vesca - they are much smaller than the garden strawberries we are used to but are supposed to be super sweet, flavory, and delicious.  Here's hoping that we get enough of a crop to make some jam!


Marty watched.


Friday, October 16, 2009

crawly creepy

Last weekend, when I was sorting out the lower vegetable bed, I came across a large, spotted brown spider in the tomatoes.  Feeling a bit more courageous than I might have without my thick garden gloves on, I decided to cut the branch she was on and move her to a new home among the eggplants.


 After moving her to the bed above, I noticed a couple things:

1) three white, spikey egg sacks that had been hidden behind the leaves I'd cut away on the tomato plant.


2) when the spider crawled to the top of the eggplant leaf, I spied a neon orange hour glass on the underside of her belly.


It was pretty easy to identify.  I typed "brown widow" into Google and found a bunch of  info.  If I'd had any doubt, the egg sacks sealed the deal of our spider being a Latrodectus geometricus - commonly known as the brown widow, a close cousin to the black widow.  After reading last weeks post on Ramshackle Solid about black widows, I felt a certain camaraderie in knowing that it wasn't just us - other people are sharing their yards and homes with these scary creatures too. But now we have kin whose poison is supposedly twice as toxic? 

I'm beginning to rethink our "catch and release" policy.

Wednesday, October 14, 2009

Changing Over


Over the past weekend we said goodbye to the tomatoes.  It was less of an emotional farewell than it was last fall - the tomatoes just weren't the same.  They were delicious, just not prolific.  We had a few rounds of bruschetta.  We have three measly jars of frozen sauce. Salsa a couple of times.  You know, just not the bounty that we had last year.  The tomatoes shared the bed this summer with four different varieties of cucumber and several types of bean that also never really sprung into action. Oh well, bring on the cool weather and the winter garden.  Brassicas here we come!

After removing all the plants, except for the spindly family of asparagus that live at one end of the bed, we added some home made amendments to the soil.  Very exciting.  This is really the first time we added a load of our own composts - worm and regular.  Though I think we could have used twice as much of both, we were kind of proud to see the efforts of tightening our waste management system go right into the garden in the form of dark, rich organic matter.  Pretty cool.  We also added some drip irrigation.


We are hoping that the new drip will do for our vegetables what it has done for the herb bed - super happy plants.  We covered the bed with a new coat of alfalfa and are looking forward to planting seed next weekend.  The upper bed, on the other hand, got only a small editing. The peppers, eggplants, and zucchini are still growing strong.  So, fingers crossed, we will have a smooth transition into the new season - some remaining summer/fall veg to use as the winter/spring things get on with it.